Making Rock Candy at Home
A few weeks ago we went to our local science museum and our 4 year old got to buy her very first stick of rock candy in the gift shop. That got me to thinking that surely we could make it at home. Sure enough, Pinterest has tons of pins for home made rock candy. Since we are always looking for ways to add STEAM to our daily learning we were excited to set up our own crystal growing experiment!
"Steam is an educational approach to learning that uses Science, Technology, Engineering, the Arts and Mathematics as access points for guiding student inquiry, dialogue, and critical thinking. The end results are students who take thoughtful risks, engage in experiential learning, persist in problem-solving, embrace collaboration, and work through the creative process. These are the innovators, educators, leaders and learners of the 21st century!"
These rock candy making instructions from Tiphero looked good so we used it to set up our own experiment. We followed the directions exactly as stated and are now waiting, observing and learning. It says it can take 1 to 2 weeks for the crystals to form.
In the meantime, we are focusing our learning on the following words and concepts for our 4 year old. She seemed to understand my simple explanations of each as we were setting up our rock candy (crystal) experiment.
Solution
States of Matter
Dissolve
Crystal
Observation
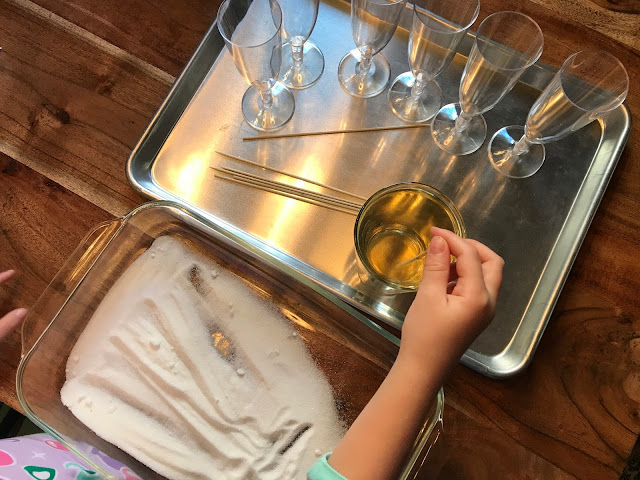
We followed TipHero's instructions for making the sugar solution. Next, we dipped wooden skewers into the solution.

Each skewer was then dredged in sugar and set aside to dry.

In the meantime, we added 5-6 drops of food coloring to plastic champagne flutes (left over from a baby shower brunch) and added the sugar solution. We used a chopstick to stir until dissolved.

We used cake decorating coloring but I'm sure regular food coloring will work too.

We suspended each sugar coated skewer in the sugar solution with a clothes pin. Be careful not to let the skewer touch the bottom or sides of your container. We placed the entire experiment on a tray and placed it in a place that will be out of the way, and not bumped (yeah right!), for the next 1-2 weeks.

I decided that little Miss 4 should make daily observations of our crystals. She liked the idea very much and ran to get her magnifying glass and notebook. She enthusiastically drew a simple picture of what she saw.


Don't you just love the deep concentration!
 Update: The results are in! See below for our beautiful rock candy!

Our little scientist is taking her observation duties very seriously. Since setting up our crystal experiment she has found various other unidentified objects lying around the house. Sadly. I have learned that yes, I need to sweep more often! Happily, I have learned that Miss 4 knows to use all of her senses when identifying unknown objects. "Looks like, tastes like and smells like a sprinkle mama!" I'd call that a success!


If you like this experiment, check out our post Bartholomew and the Oobleck
According to educationcloset.com
"Steam is an educational approach to learning that uses Science, Technology, Engineering, the Arts and Mathematics as access points for guiding student inquiry, dialogue, and critical thinking. The end results are students who take thoughtful risks, engage in experiential learning, persist in problem-solving, embrace collaboration, and work through the creative process. These are the innovators, educators, leaders and learners of the 21st century!"
These rock candy making instructions from Tiphero looked good so we used it to set up our own experiment. We followed the directions exactly as stated and are now waiting, observing and learning. It says it can take 1 to 2 weeks for the crystals to form.
In the meantime, we are focusing our learning on the following words and concepts for our 4 year old. She seemed to understand my simple explanations of each as we were setting up our rock candy (crystal) experiment.
Solution
States of Matter
Dissolve
Crystal
Observation

We followed TipHero's instructions for making the sugar solution. Next, we dipped wooden skewers into the solution.

Each skewer was then dredged in sugar and set aside to dry.

In the meantime, we added 5-6 drops of food coloring to plastic champagne flutes (left over from a baby shower brunch) and added the sugar solution. We used a chopstick to stir until dissolved.

We used cake decorating coloring but I'm sure regular food coloring will work too.

We suspended each sugar coated skewer in the sugar solution with a clothes pin. Be careful not to let the skewer touch the bottom or sides of your container. We placed the entire experiment on a tray and placed it in a place that will be out of the way, and not bumped (yeah right!), for the next 1-2 weeks.

I decided that little Miss 4 should make daily observations of our crystals. She liked the idea very much and ran to get her magnifying glass and notebook. She enthusiastically drew a simple picture of what she saw.


Our little scientist is taking her observation duties very seriously. Since setting up our crystal experiment she has found various other unidentified objects lying around the house. Sadly. I have learned that yes, I need to sweep more often! Happily, I have learned that Miss 4 knows to use all of her senses when identifying unknown objects. "Looks like, tastes like and smells like a sprinkle mama!" I'd call that a success!

A rogue sprinkle!
The Results
14 days later and we have rock candy! It's small, but it's rock candy! It is definitely larger then when we started so we will call that a success. We learned lots about evaporation, super saturated, solutions and patience. We can't believe that a single piece of rock candy is made up of a quadrillion molecules. That's 15 zeros!!!! If we were to do this experiment again, we would
grow our crystals in a dark, cool place instead of on the kitchen counter under a can light.


Comments
Post a Comment